
So, you’ve got yourself a young oak tree sapling, and you’re ready to get it in the ground. Awesome! Planting an oak tree sapling the right way is super important if you want it to grow up big and strong. It’s not just about digging a hole and sticking it in. There are a few key things to know, like where the roots start and how deep to plant it. Get these wrong, and your little tree might not make it. Let’s break down how to give your oak the best start possible.
Why Proper Oak Tree Planting Matters
So, you’ve got a young oak sapling, ready to go in the ground. That’s awesome! But before you just dig a hole and plop it in, let’s talk about why doing this right is a big deal. It’s not just about making your yard look nice; it’s about the tree’s whole life. Planting an oak tree incorrectly, especially too deep, is honestly the number one reason these beautiful trees don’t make it past their first few years. It’s a shame, really, because a healthy oak can live for centuries, providing shade, cleaning the air, and supporting wildlife. Getting the planting right from the start sets your tree up for a long, strong life.
Think about it: a tree that struggles from day one will never reach its full potential. It might survive, sure, but it’ll likely be weak, prone to disease, and a potential hazard down the road. We’re talking about trees that could eventually become majestic giants, but if planted wrong, they might just become a costly problem to remove. Proper planting helps the tree establish a solid root system, which is key for stability and health. This means less chance of it toppling over in a storm, which is good for your property and your peace of mind. Plus, a well-planted tree is a better environmental citizen. It can absorb more rainwater, reducing runoff, and provide much-needed shade that actually cools your home. It’s a win-win, really.
Here’s a quick rundown of what we mean by ‘proper planting’:
- The root flare needs to be visible above the soil.
- The planting hole should be wide, not deep.
- Mulch should be kept away from the trunk.
- Any tags, ties, or wire baskets need to be removed.
Taking a little extra time now to plant your oak sapling correctly is an investment in its future, and in the beauty and health of your landscape for decades to come. It’s about giving that little tree the best possible start so it can grow into the magnificent oak tree it’s meant to be.
Understanding Oak Tree Growth Habits
Oak trees are a long-term commitment, and their growth habits can really surprise anyone who’s only seen them as small saplings. Most oaks start off fairly slow, but don’t let that lull you into underestimating their eventual size.
Here’s what you need to know about how oaks grow:
- They develop a strong, deep taproot early on, which lets them seek out moisture underground. This helps them survive tough conditions later, but means that transplanting older oaks is risky since those roots are easily damaged.
- Their spread is wide some mature oaks reach 60 feet or more both in height and canopy. Even though that little tree looks small now, its branches and roots will fill the space.
- Young oaks focus a lot of energy on root growth in the first several years before you see much top growth. After that, growth above ground picks up speed an oak might add a foot or two of height each year under good conditions.
Young oaks may seem slow at first, but patience pays off by planting with their growth habits in mind, you save yourself trouble down the road.
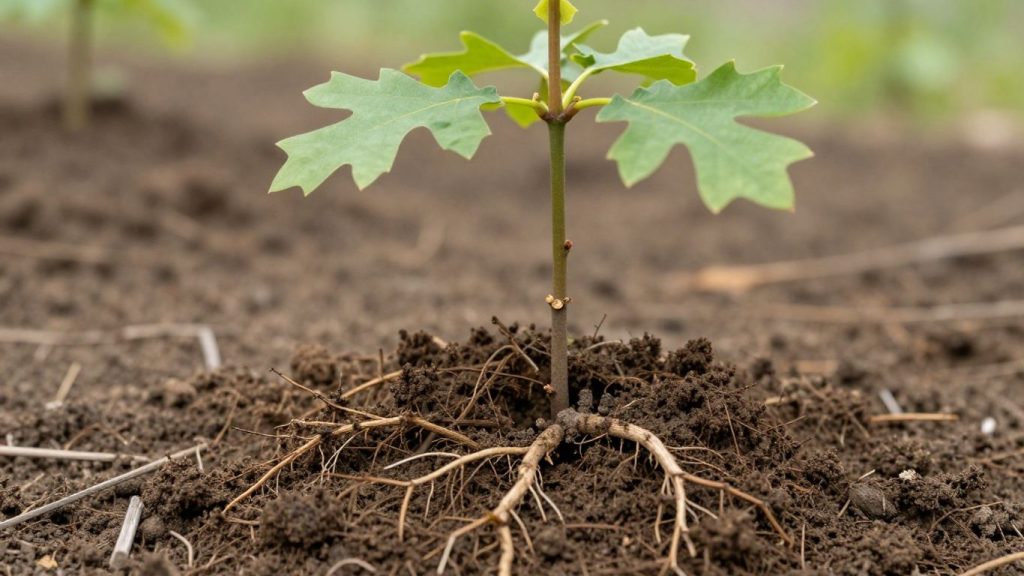
Root Flare: The Most Important Step in Planting an Oak Tree Sapling
Okay, let’s talk about the root flare. If you remember just one thing from this whole planting process, make it this: the root flare needs to be visible. Seriously, this is where a lot of trees go wrong right from the start. It’s that part of the trunk where it starts to widen out and turn into the main roots. Think of it like the tree’s shoulders, where it connects to the ground.
What Is the Root Flare?
The root flare, sometimes called the root collar, is the base of the tree trunk where it transitions into the root system. It’s where the trunk visibly flares out, and you can see the main structural roots beginning to spread. This area is super important because it’s where the tree breathes and takes in water and nutrients. It’s not meant to be buried.
Why the Root Flare Must Be Above Soil Level
When you plant a tree too deep, burying that root flare, you’re basically suffocating it. The bark on the trunk isn’t designed to be constantly wet and sitting in soil. It can lead to rot, fungal diseases, and eventually, the tree can’t get the stuff it needs to survive. It’s like trying to breathe with a pillow over your face, not going to work for long. Keeping the root flare exposed is the single biggest factor in preventing long-term tree failure.
How to Locate the Root Flare in Container or Burlap Trees
Finding the root flare can sometimes be a little tricky, especially with trees from a nursery. Often, they’re already planted a bit too deep in their pots. You might need to gently scrape away some of the topsoil in the container until you see that distinct widening where the roots start to spread out. Don’t be afraid to dig in a little bit just be careful not to damage any roots.
For trees that come balled and burlapped, you’ll need to remove the burlap and any twine or wire basket once the tree is in the hole. Then, you can find the flare and make sure it’s positioned correctly. The goal is to have the flare sitting at or slightly above the level of the surrounding soil. This is a key part of the root flare planting technique.
Planting too deep is the number one reason trees die after they’ve been put in the ground. It’s a simple fix, but one that gets overlooked way too often. Just remember to look for where the trunk starts to get wider and make sure that part isn’t covered up by dirt.
Here’s a quick checklist for getting the root flare right:
- Look for the flare: Gently brush away soil at the base of the trunk until you see the main roots begin to spread.
- Position correctly: The flare should be at or slightly above the final soil level.
- Avoid the “volcano”: Don’t pile mulch up against the trunk. Keep it a few inches away to let the flare breathe.
Proper Planting Depth (The #1 Cause of Tree Failure)
Alright, let’s talk about planting depth. This is a big one, seriously. A lot of trees don’t make it because they’re planted wrong from the start, and usually, it’s because they’re buried too deep. Think of it like this: trees need to breathe, and their roots need oxygen. When you plant a tree too deep, you’re basically suffocating it. The part where the trunk starts to widen out into roots, called the root flare, needs to be visible, sitting right at or slightly above the soil level. If you bury that flare, the bark can start to rot because it’s constantly wet, and that stops the tree from getting the nutrients it needs. It’s a slow death sentence.
So, how do you get it right? It’s all about digging the right hole. You want the hole to be wide, not deep. Imagine a shallow saucer rather than a deep pot. The hole should only be as deep as the root ball itself, from the root flare down to the bottom. But make it at least two to three times wider than the root ball. This gives the roots room to spread out into the surrounding soil easily. If you’re planting a tree that came in a container, you might need to gently scrape away some of the top soil in the pot to find that root flare. It’s often buried a bit even when you buy it.
Here’s a quick rundown:
- Find the Root Flare: Always locate where the trunk widens into roots. This spot must be above ground.
- Dig Wide: Make the hole 2-3 times wider than the root ball.
- Dig Shallow: The hole depth should match the root ball height, from flare to bottom.
- Check Container Trees: Gently remove topsoil to expose the flare if needed.
Planting too deep is a common mistake that leads to root rot and eventual tree failure. It’s better to plant slightly high than too low. This simple adjustment can make all the difference for your oak sapling’s long-term health and survival. Remember, proper tree planting depth is key to a thriving tree.
Getting this right from the start means your oak sapling has a much better chance of establishing a strong root system and growing into a healthy, mature tree. It’s a small detail that has a huge impact on the tree’s life. For more on keeping your trees healthy long-term, consider looking into preventative tree maintenance services.
Correct Spacing for Oak Trees
When you’re planting an oak sapling, it’s easy to get caught up in the immediate excitement of getting it in the ground. You’re focused on the root flare, the depth, and making sure it’s stable. But don’t forget to look ahead way ahead. Oak trees grow into giants, and giving them enough room from the start is super important.
Think about the mature size of the oak species you’ve chosen. Some can spread 50, 60, or even 80 feet wide! Planting too close to your house, other trees, or structures like fences or sheds is a recipe for future problems. Branches rubbing against your siding can cause damage, and a massive root system can eventually interfere with foundations or underground pipes. Plus, you want to avoid future conflicts with overhead power lines.
Here’s a general guideline to get you started:
- For most large oak species: Aim for a minimum of 30-50 feet of clear space around the tree’s eventual canopy. This gives them room to spread their branches without crowding.
- Consider proximity to buildings: Plant at least 20-30 feet away from your home’s foundation. This distance helps prevent root issues and keeps falling branches and leaves away from your roof.
- Spacing between trees: If planting multiple oaks, give them at least 40-60 feet between trunks. This allows each tree to develop its full, majestic form.
Always check the specific mature spread for your oak variety. A quick search online or a chat with your local nursery can give you the exact numbers. Planning for space now saves a lot of headaches and potential costs down the road.
Step-by-Step Guide to Planting an Oak Tree Sapling
Alright, let’s get down to business with planting your new oak tree sapling. It’s not rocket science, but doing it right makes a huge difference for the tree’s future. Think of it as giving your little tree the best possible start in life.
First things first, pick the right spot. Consider how big this oak will get they can become quite massive! You don’t want it crowding your house or power lines down the road. Also, think about sunlight. Most oaks like a good amount of sun, so find a spot that gets at least six hours a day.
Now, let’s talk about the hole. This is where a lot of people mess up. You want to dig a hole that’s about two to three times wider than the root ball, but no deeper than the root ball itself. Seriously, don’t dig a deep, narrow hole like you’re planting a flagpole. You’re creating a wide, shallow area for the roots to spread out easily. Imagine it like a saucer, not a pot.
Before you plop the tree in, you have to find that root flare. It’s that slight swelling where the trunk starts to spread into the roots. If the tree came in a container, gently tip it out and check. If it’s in burlap, you might need to cut away some of the material. The root flare needs to be visible and sit right at or slightly above ground level. Burying it is a one-way ticket to root rot and a sad, unhealthy tree.
Once you’ve got the hole prepped and the root flare exposed, carefully place the sapling in the center. Make sure it’s standing up straight. Now, start backfilling with the soil you dug out. Don’t stomp on it like you’re trying to compact concrete. Just gently firm the soil around the roots to get rid of big air pockets. You can add a bit of compost if your soil is really poor, but mostly, native soil is best.
After it’s mostly backfilled, give it a good, slow watering. Let that water soak in and settle the soil. You might need to add a little more soil if it sinks down a lot. Finally, add a layer of mulch, like wood chips, around the base. Keep the mulch a few inches away from the trunk itself no volcano mulching! This helps keep moisture in and weeds down.
Here’s a quick rundown:
- Dig Wide, Not Deep: Aim for a hole 2-3 times wider than the root ball, but only as deep as the root ball.
- Find the Root Flare: This is non-negotiable. It must be at or slightly above soil level.
- Backfill Gently: Use native soil and lightly firm it around the roots.
- Water Thoroughly: Give it a good soak right after planting.
- Mulch Wisely: Apply a layer of mulch, keeping it away from the trunk.
Choosing the best time to plant oak saplings usually falls into the cooler, wetter months thintreek spring or fall. This gives the roots a chance to establish before the heat of summer or the harshness of winter sets in. Proper planting of an oak tree sapling now sets it up for a long, healthy life. Following these steps for how to plant an oak tree is key to successful oak tree sapling care.
Common Mistakes to Avoid
It’s easy to get carried away when planting an oak tree sapling, but a few simple mix-ups can really hold your tree back sometimes for years. Most folks mess up with depth, location, or care without even realizing it. I’ve seen so many well-meaning people end up with a weak, struggling oak and wonder where things went off the rails.
Here are the top mistakes to dodge:
- Planting the tree too deeply: Burying the root flare can suffocate roots and cause bark rot. That bulge where roots spread from the trunk needs to stay above ground.
- Digging a narrow or deep hole: The hole should be 2–3 times wider than the root ball, not deeper. This gives roots space to reach out. Check out more on proper planting width.
- Mulch piled against the trunk: The so-called “mulch volcano” keeps moisture trapped at the bark, inviting rot and pests. Pull mulch back to leave space around the base.
- Ignoring root defects: Container trees often have circling roots if you don’t loosen or cut these, they keep wrapping around, eventually choking the tree.
- Not removing all packaging: Leaving on twine, synthetic burlap, or wire can girdle roots over time.
- Over- or under-watering: Light, frequent watering encourages weak, shallow roots. You need to water deeply so the soil is moist well below the surface.
- Planting in the wrong spot: Oaks grow big too close to buildings, fences, or under power lines, and you’ll have trouble as they mature.
Don’t rush and don’t cut corners; a few extra minutes at planting can save you years of headaches down the line. Double check that flare, the hole, and the space you’re giving this future giant.
Aftercare: First 3 Years Are Critical
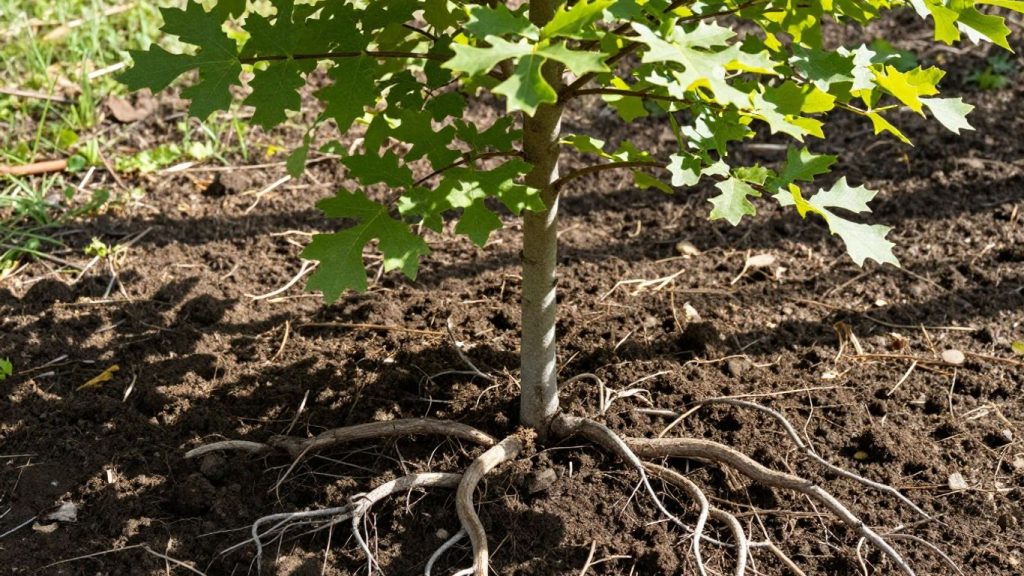
So, you’ve planted your oak sapling. Great job! But don’t think your work is done just yet. Those first few years are super important for helping your new tree get established and grow strong. It’s kind of like raising a kid they need consistent attention when they’re young.
Watering is probably the biggest thing to get right. Newly planted trees don’t have deep roots yet, so they can’t find water on their own. You’ll need to water regularly, especially during dry spells. Aim for a deep watering rather than a quick sprinkle. Think about letting a hose trickle at the base for a good 30-60 minutes. This encourages the roots to grow down, where they’ll be happier in the long run. A good rule of thumb is about an inch of water per week, but you’ll need to adjust based on the weather. If it’s super hot, you might need to water more often.
- First few weeks: Water daily or every other day, depending on how hot it is.
- First year: Aim for about 1 inch of water per week, delivered slowly and deeply.
- Years 2 and 3: Continue watering regularly, especially during dry periods, though you might not need to water as frequently as the first year.
Don’t forget about staking. If you staked your tree, keep an eye on the ties. You don’t want them to dig into the bark as the tree grows. Loosen or adjust them as needed. Most trees only need staking for about a year, maybe two at most, to help them get stable. After that, letting the tree sway a bit in the wind actually helps it build a stronger trunk. So, remove those stakes when the time is right.
Fertilizing usually isn’t necessary right away. The soil you planted in should have enough nutrients. If you feel like your tree really needs a boost after the first year, you can consider a balanced fertilizer, but don’t overdo it. Too much can actually harm young trees. It’s often better to let the tree focus on root development first. If you’re thinking about adding any soil amendments, it’s a good idea to check with a local nursery or garden center for advice specific to your area.
Mulch is your friend, but only when applied correctly. A layer of organic mulch, like wood chips or shredded bark, around the base of the tree is great for retaining moisture and suppressing weeds. Just make sure to keep the mulch a few inches away from the trunk itself. You don’t want it piled up against the bark, as that can lead to rot and invite pests.
Checking for pests and diseases is also part of the routine. Young trees can be more vulnerable, so a quick inspection every now and then can catch problems early. Look for any unusual spots on the leaves or signs of insect activity. The sooner you spot something, the easier it is to deal with.
When to Call a Professional Arborist
So, you’ve planted your little oak sapling, and it’s looking good. That’s awesome! But sometimes, even with the best intentions, things get a bit tricky, or maybe you’re just not sure if you’re doing everything right. That’s when it’s totally okay to call in the pros.
Don’t hesitate to reach out to a certified arborist if you notice any of these issues. They’ve got the know-how to spot problems you might miss and can help keep your tree healthy and safe for years to come. It’s not a sign of failure; it’s a smart move to protect your investment.
Here are a few situations where professional help is a good idea:
- Dealing with Large Trees: If you’re planting a tree that’s already got a pretty thick trunk (think bigger than a quarter), it’s often best left to the experts. They have the right tools and techniques to handle them without causing damage.
- Tricky Planting Spots: Got a steep slope, a really tight space near a building, or are you worried about underground utility lines? An arborist can assess the site and plant the tree correctly, avoiding future headaches.
- Signs of Trouble: If your tree looks off maybe it’s leaning strangely, has cracks in the bark, or you see limbs dying off it’s worth getting a professional opinion. They can figure out if it’s a disease, pest, or something else that needs attention. You can find a qualified tree service contractor near you to help with these kinds of concerns.
Sometimes, a tree might just look a little sad after planting, or maybe it’s not growing as fast as you expected. While a little patience is usually the answer, if you’re seeing persistent wilting, yellowing leaves that aren’t seasonal, or signs of insect damage that you can’t identify, it’s a good cue to get an expert eye on it. They can diagnose issues like nutrient deficiencies or early-stage diseases before they become major problems.
Wrapping Up Your Oak Planting
So, there you have it. Planting an oak sapling might seem straightforward, but getting those little details right, like the root flare and planting depth, really makes a difference. It’s not just about digging a hole and dropping the tree in. Taking a bit of extra time to understand how the tree grows and what it needs will help it thrive for years to come. Think of it as giving your new tree the best possible start. With the right care from the beginning, your oak has a much better shot at growing into a strong, healthy tree that you can enjoy for a long, long time.
Frequently Asked Questions
Why is planting a tree too deep such a big problem?
Planting a tree too deep is like suffocating it. The part of the trunk where the roots spread out, called the root flare, needs air. When it’s buried, the roots can’t get oxygen, and the trunk’s bark can rot because it’s constantly wet. This can kill the tree over time.
How can I find the root flare on my sapling?
Look at the very bottom of the trunk. You’ll see where it starts to widen out and turn into the main roots. Sometimes, especially in pots, the nursery might have added extra soil. Gently brush away the top layer of soil in the pot until you clearly see these main roots spreading out. That’s your root flare!
What’s the best shape and size for the planting hole?
Think wide and shallow, not deep and narrow. The hole should be about two to three times wider than the tree’s root ball. It should only be as deep as the root ball itself, so the root flare sits right at or slightly above the ground level. This helps roots spread out easily into the surrounding soil.
Should I add anything to the soil when I backfill the hole?
It’s best to use the soil you dug out from the hole (native soil) to fill it back in. Avoid adding a lot of compost or fertilizer directly into the hole, as this can make the roots hesitant to grow out into the surrounding native soil. You can add mulch on top later, but keep it away from the trunk.
How often should I water my newly planted oak tree?
Newly planted trees need consistent watering, especially during their first year. Water deeply right after planting. Then, check the soil moisture regularly. It’s usually best to water deeply a few times a week, or more if it’s very hot or dry, making sure the soil stays moist but not waterlogged. For larger trees, this need for extra watering can last for a couple of years.
When is it okay to prune a new sapling?
Resist the urge to prune the top of a new sapling to make it look balanced. The leaves are crucial for making energy to help the roots grow strong. Only trim branches that are broken, dead, or clearly diseased. Let the tree focus its energy on establishing its root system first.
Serving the Greater Toronto Area